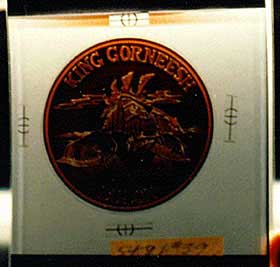
| A Coin is Born Kenner's Power of the Force Coins, from Concept to Mass Production Introduction: The Archive is fortunate to be capable of displaying such a wide variety of items relating to the development of Kenner's Power of the Force coin line. From original plaster sculptings, to intermediate hardcopies and softcopies, to early production tests, there is perhaps no other Archive collecting category that is so fully represented. This article doesn't seek to present the entire history of the coin line. Rather, it is an attempt to summarize some of the phases of its development leading up to mass production. The included information was acquired from mulitiple sources, drawn from within Kenner and without, all of whom had a direct involvement with the coin line's development, whether it be at the level of design, sculpting or prototyping. This research was conducted over a period of several years, by Todd Chamberlain, Gus Lopez, Chris Georgoulias and myself, Ron Salvatore. | |||||||||||||||||||||||||||||||||||||||||
| Concept The Power of the Force coin concept began as a means of enlivening a dying toy line. By late 1984 Return of the Jedi was gone from theaters and Kenner was faced with the daunting task of keeping their Star Wars line vital without the support of a blockbuster movie. 1985's Power of the Force toy line was the company's first attempt at moving the license into a new, Kenner-generated marketing arena. Merchandising graphics shifted from film-derived photos to original artwork, a new all-encompassing logo was developed, and special bonus products were attached to the line in order to make it more appealing to consumers.
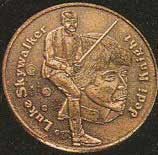
The folks at Kenner likely knew from the outset what their coins would basically look like--aluminum, round, a little over an inch in diameter, with a character image on the front and some text on the back. Moreover, they probably realized that they would need to hand over much of the developmental work to outside firms if they wanted to have the product ready in a short span of time. However, evidence suggests that there was some conceptual work done in-house, if for no other reason than to present the coin concept in rough tangible form. Namely, there exists an early Luke Jedi coin, which depicts the character both in profile and at full height. Gold in color, this Luke piece is probably the earliest three-dimensional coin prototype in existence. But, of course, the basic design idea it represented was polished considerably following its creation. This was probably done with the aid of conceptual sketches, which would have been worked over and modified until the final look of the coins (the format of the character images, the placement of the text, etc.) was settled upon. Once this was accomplished, the design process could enter its more advanced stages.
Production Step 1: Design Note: Images of many conceptual coin sketches comprise a related Special Feature, available here. | |||||||||||||||||||||||||||||||||||||||||
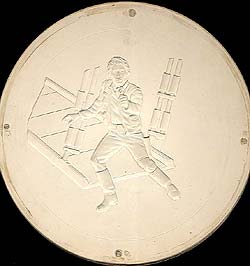
| Production Step 2: Sculpting After each of this illustrator's designs was approved by Kenner and Lucasfilm, it was time to transfer the two-dimensional drawings into three-dimensional sculptings. In order to speed up the sculpting process, Kenner shopped a good deal of the work out to non-Kenner sculptors, including some who had once worked for Franklin Mint. All sculptings were done as positives, meaning their details were raised not depressed, and most seem to have been done at a 6:1 sculpting-to-production size ratio, in order to maximize the amount of precision the sculptor was able to bring to his work. In other words, most of the coin sculptings were a full 6 times larger than the coins that would eventually be mass-produced.
| |||||||||||||||||||||||||||||||||||||||||
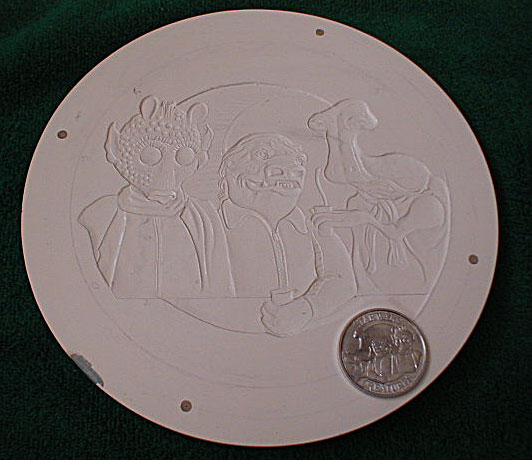
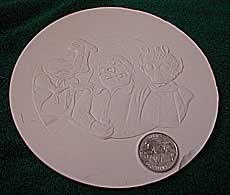
Once a sculpting was finished and approved it was then sent to another outside firm. This company was employed by Kenner to create the hardcopies which would eventually be used as the masters from which production dies could be produced. The first step in this company's work was the creation of a negative epoxy hardcopy, or a rigid cast of the original sculpting made by applying a hardening compound to the sculpting's surface and pulling it off. Since both plaster and wax are pourous materials, to which epoxy will readily adhere, a PVA mold release was first applied to the whole of the sculpting's surface. Green in color, the release served to seal off the plaster so that the epoxy could be easily removed from it once it had hardened.
| |||||||||||||||||||||||||||||||||||||||||
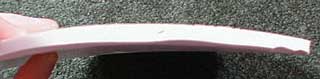
Ulitimately, a negative hardcopy much like the one described in Step 3 was what was required to cut the final production die. However, in order to insure that the die, as it stamped out the aluminum production coins, struck correctly, a negative master with a slightly convex bend to its surface was required. In other words, the hardcopy used for cutting the die had to possess a surface that curved outward in order to create a die that also curved outward. In order to achieve this convex shape in the final tooling master, an intermediate step was required in which a flexible positive cast was made off of the "stage 1" hardcopy. The hardcopy described above was first made plumb over the entirety of its outer diameter, a hole being drilled at each of its compass points and the outer edge being sanded down until each of these holes was aligned correctly. This accomplished, a plastic rim was then placed around the hardcopy to serve as a retaining wall, and an RTV (room temperature vulcanizing) silicone compound was poured over the entirety of its surface. Because silicone will adhere to vitually nothing, no mold release was needed at this stage.
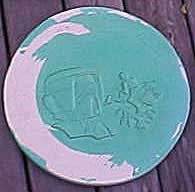
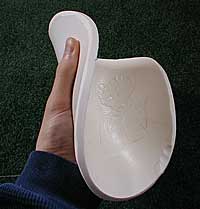
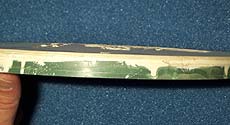
Since the RTV employed for this application was of a type normally used for making prototype molds from which urethane parts could be cast, and was specially formulated to seep into the most minute of details, it was ideal for replicating in positive form the negative detail of the "stage 1" hardcopy. Once cured, the RTV silicone could be easily pulled off of the surface of the hardcopy. The product was an approximately 1/2 inch thick rubber disk, about 9 inches in diameter, with positive detail and an incredible amount of flexibility. Because the pliability of these rubber disks is virtually the exact opposite of the rigid hardcopy, they have come to be referred to by collectors as "softcopies,". The people who made them, however, commonly refer to them as "rubbers." | |||||||||||||||||||||||||||||||||||||||||
The softcopy's reason for existence was its flexibility; each would be bent slightly and then used to create a second, or "stage 2" hardcopy, this one with the required convex surface. To accomplish this, the softcopy was placed into a bowl-shaped template, which was surrounded by a slight retaining wall. Then the epoxy application procedure described in Step 3 was repeated, the only difference being that this time the epoxy was brushed onto the softcopy rather than the sculpting.When the layer of white epoxy was cured and reinforced with a layer of green Dynacast, it was pulled from the softcopy.
| |||||||||||||||||||||||||||||||||||||||||
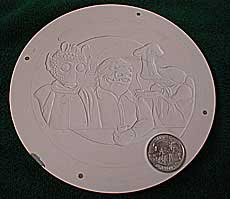
The job of the company contracted out by Kenner to prototype their coins was now complete: they had created the final masters from which the production dies could be made. A die is, quite simply, a piece of steel engraved with the negative image of the item it is meant to produce. During production, the die is struck against the production material (aluminum in this case) with such force that it imbues this material with a positive impression of its detail. To create these dies, however, the involvement of yet another non-Kenner firm was necessary, this one specializing in the creation of tools and dies for mass-production. All of the "stage 2" hardcopies were boxed up and shipped to this firm. Once there, a pantograph machine was used to simultaneously reduce them in scale and cut their negative details into the pieces of steel that would become the production dies. Equipped with gears capable of translating detail from one scale into another, a pantograph basically consists of a needle on one end, which traces a given item, and a milling machine on the other, which cuts what the needle traces into steel at whatever scale it's set for. In the case of the Kenner coins, the machine was set to reduce the "stage 2" hardcopies by about 6 times, so that the 9 inch diameter epoxy disks were effectively translated into steel dies with working diameters of about 1.5 inches each. Once the detail was in place on each die, the text was then cut through an etching process around its upper and lower borders. Additionally, a second die half was made for the back of each coin, but as this involved only textual detail, all of which could be etched directly into the die, no sculptings, hardcopies or softcopies were required. | |||||||||||||||||||||||||||||||||||||||||
| Step 7: Production Tests However, the first die created, that used to produce the Luke X-Wing pilot coin, was smaller than 1.5 inches in diameter.
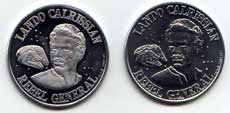
Kenner is also known to have considered the idea of producing their coins with frosted detail, an effect produced by having the dies strike twice when stamping out each coin.An unknown number of Lando
Of course, many coin variants were produced as well, most having to do with the textual details on the fronts and backs of the coins. The "Sail Barge" and unnamed versions of the Sail Skiff coin and the "Hans Solo" version of the Han Solo in Trenchcoat coin are notable examples of this. These too are probably the results of early production tests, the changes implemented in their designs coming as the results of spelling corrections, Lucasfilm requests, or changes in Kenner marketing strategy. In addition, some gold and bronze colored prototypes are known to exist, as well as a whole host of Droids and Ewoks coin oddities. It is impossible to say what purpose all of these prototypes served, but their great number illustrates the many changes the coin line went through prior to production. Here ends our look at the developmental process behind the Kenner coin line. Of course, there is a great deal more to tell about the coins in general, but that's really beyond the scope of this article. For more information about the Power of the Force, Droids and Ewoks coins, coin prototypes and related concepts, check out the Archive's extensive Coin gallery, as well as our Comprehensive Guide to Power of the Force, Droids and Ewoks Coins. Also, don't forget to check out our related Special Feature concerning the original design sketches behind the POTF coin line. | |||||||||||||||||||||||||||||||||||||||||
